Strategy category · Range and neutral

No direction needed. Both sides capped.

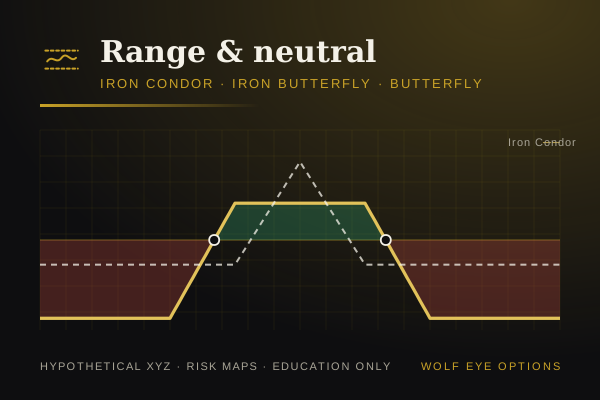
Iron condors, iron butterflies, and butterflies profit when a stock stays inside a range. The collar does the same job for stock you already own, fencing in both the floor and the ceiling. Every structure here has a defined worst case on both sides.

  • Defined risk first
  • Hypothetical XYZ risk maps
  • Education, not advice
Range and neutral: hypothetical XYZ risk maps
Hypothetical XYZ · expiration risk mapsRisk map

Who it is for

Built for traders who want the worst case known first

Range trades are where a lot of experienced traders spend time, because most stocks spend most days not trending. They are also short-volatility trades, which means a trending tape can walk right through them. This category teaches both sides of that.

Every structure below is drawn as a risk map before a single number is discussed.

What is inside

Four structures for a range

The lessons compare the profit zone, credit or debit, and management plan of each structure so you can match the tool to the range you expect.

Neutral · credit

Iron condor

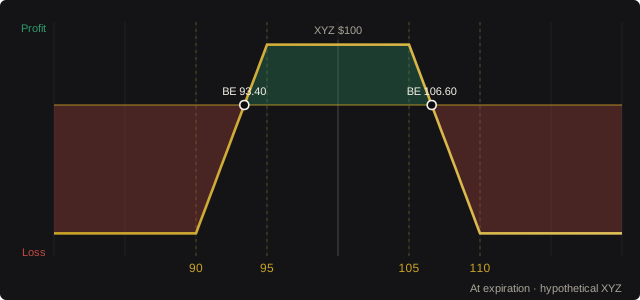
Hypothetical XYZ risk map for the Iron condor: profit zone in green, loss zone in red, breakevens marked
Risk map · hypothetical XYZ · at expiration

A bull put spread below the market plus a bear call spread above it. Profit if the stock stays between the short strikes.

Use it when: implied volatility is rich, there is no event inside the window, and you expect a range.

Hypothetical · XYZ at $100
StructureSell 95/90 put spread + sell 105/110 call spread, 30 days
Credit$1.60 ($160)
Max gain$160, between $95 and $105
Max loss$340, only one side can lose
Breakevens$93.40 and $106.60

What kills it: a trend through one wing; holding a tested side into expiration week.

Read the full lesson →
Neutral · credit

Iron butterfly

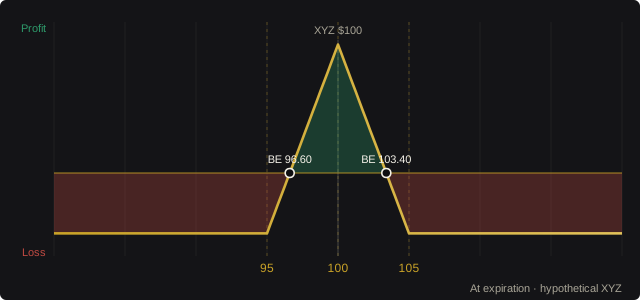
Hypothetical XYZ risk map for the Iron butterfly: profit zone in green, loss zone in red, breakevens marked
Risk map · hypothetical XYZ · at expiration

Sell a straddle at the current price and buy wings on both sides. Higher credit than a condor, narrower profit zone.

Use it when: you expect the stock to pin near a specific price, often after an event has passed.

Hypothetical · XYZ at $100
StructureSell 100 put + 100 call, buy 95 put + 105 call
Credit$3.40 ($340)
Max gain$340, at exactly $100
Max loss$160, below $95 or above $105
Breakevens$96.60 and $103.40

What kills it: any meaningful move; it needs management sooner than a condor.

Read the full lesson →
Neutral · debit

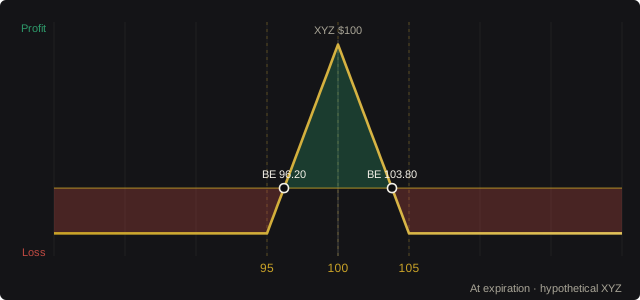
Long call butterfly

Hypothetical XYZ risk map for the Long call butterfly: profit zone in green, loss zone in red, breakevens marked
Risk map · hypothetical XYZ · at expiration

Buy one lower call, sell two middle calls, buy one upper call. A cheap, defined-risk bet that the stock finishes near the middle strike.

Use it when: you have a specific target price and want a low-cost structure that pays most if it lands there.

Hypothetical · XYZ at $100
StructureBuy 95 call, sell 2× 100 calls, buy 105 call
Net debit$1.20 ($120)
Max loss$120, below $95 or above $105
Max gain$380, at $100
Breakevens$96.20 and $103.80

What kills it: the stock finishing away from the middle; small debit, but the full payoff needs precision.

Read the full lesson →
Neutral · stock hedge

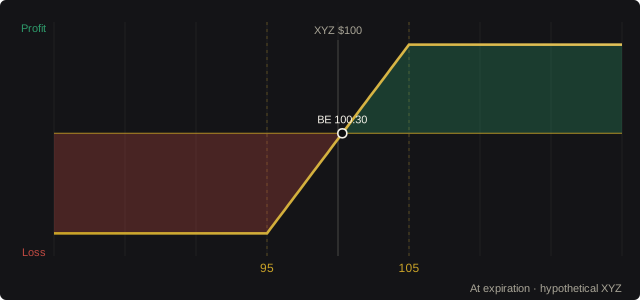
Collar

Hypothetical XYZ risk map for the Collar: profit zone in green, loss zone in red, breakevens marked
Risk map · hypothetical XYZ · at expiration

Own stock, buy a protective put below, sell a call above to help pay for it. A bracket around a stock position.

Use it when: you want to keep a stock position through a risky window and are willing to cap the upside to fund the floor.

Hypothetical · XYZ at $100
StructureOwn 100 shares at $100, buy 95 put ($1.80), sell 105 call ($1.50)
Net cost$0.30 ($30)
Max loss$530, at $95 or below
Max gain$470, at $105 or above
Trade-offUpside capped at $105

What kills it: a big rally you no longer participate in above the call strike.

Read the full lesson →

How we use it

Range trades, managed

A range trade is a bet that nothing much happens. The lessons spend as much time on what to do when something does happen:

  • Check the calendar first: no earnings or major macro release inside the window
  • Size off the max loss of one side, not the credit
  • Decide in advance what a test looks like and whether you close or roll
  • Take a large share of max profit early rather than holding for the last few dollars

The Wolf Eye rules

Know the worst case first. Max loss in dollars, before entry.

Size off the max loss. 0.5% to 1% of the account per idea.

Write the exit before the entry. Kill a failed thesis at the close.

Bucket correlated names. 1% to 1.5% total.

How it fits

How this category fits the Wolf Eye path

The free Field Manual introduces the iron condor. The Options Courses Pack ($297) covers all four structures here in full, with videos. The Service shows how a neutral idea sits next to directional ones in a daily book.

Free entry

Field Manual + 5-day course, 3-day Ideas sample, or Glossary + video.

Free

Wolf Eye Starter Week

7-day defined-risk verticals mini-course + sample Ideas list.

$36 one time

Options Courses Pack

Full 20-strategy curriculum with a video for each.

$297 one time

Wolf Eye Options Service

Daily 2pm PT Ideas list, playbook, and Options Courses access.

$9 for 3 days, then $97/mo or $997/yr
Take the $9 3-day trial for the Wolf Eye Options Service

Your next step

Learn to trade the range, and the test

Get the 2pm Ideas list and access to the Options Courses, including every range-bound lesson, with the three-day trial.

New to options? Start free with the Options Field Manual, or go one step at a time with Wolf Eye Starter Week ($36).

Questions

Straight answers

Why is the iron condor's max loss only one side?

Because the stock cannot finish below the put spread and above the call spread at the same time. Only one side can lose at expiration.

Why is the collar on this page and on the protection page?

Because it does both jobs: it protects a stock position and it brackets that position into a range. The lesson covers both uses.

Is this investment advice?

No. Everything on this page and inside the products is education and research. Examples use a hypothetical ticker, XYZ. You decide what, if anything, fits your own account.

What happens after the $9 trial?

The trial runs for 3 days. After that it continues at the plan shown on the checkout page unless you cancel before it ends. Full plans are $97 per month or $997 per year; see the Service page.

Education disclaimer. Wolf Eye Options is an education and research publication. Nothing on this page is investment advice, a recommendation, or an order to buy or sell any security, and nothing here is personalized to your situation. Options involve substantial risk and are not suitable for every investor; an option can expire worthless and you can lose the entire premium paid, and some structures (such as covered calls and cash-secured puts) carry the downside risk of owning stock. All trade examples are hypothetical, use the placeholder ticker XYZ, ignore commissions, fees and assignment risk, and are shown only to explain structure and risk. No results, returns, or win rates are claimed or implied. Before trading options, read Characteristics and Risks of Standardized Options published by the OCC, and consider consulting a licensed professional.